deskshare logo
Products
Download
Support
Support Forum

Ask questions and find solutions to common problems.


Technical Support

Your complete reference to product technical support.


Lost License Key

Retrieve your purchase history using our automated system.

Resources
Articles

Read expert insights on how to get the most out of our software.


Video Tutorials and Manuals

Learn new features and functions with our easy to follow videos and guides.

Contact Us
Contact Us

Your direct line to chat with us.


About Deskshare

Discover our story and values

| My Account -->
    Deskshare Support Forums
    • Recent
    • Popular
    • Login
    1. Home
    2. DeskShare_-_Support
    3. Posts
    D
    Offline
    • Profile
    • Following 0
    • Followers 0
    • Topics 0
    • Posts 1,425
    • Groups 0

    Posts

    Recent Best Controversial
    • RE: Make sure Android USB debugging is enabled

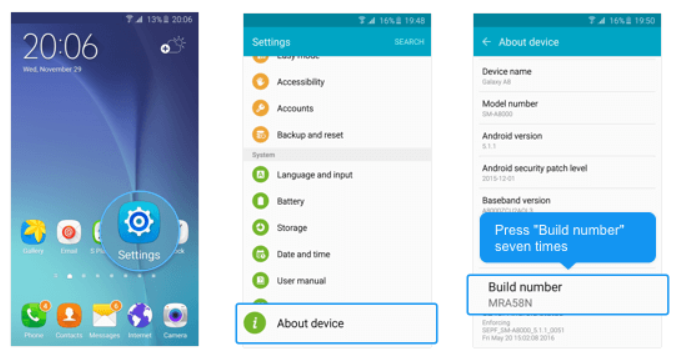
      On Android 4.1 and lower, the Developer options screen is available by default, on Android 4.2 and higher, do the following:

      1. Open the Settings app
      2. Scroll to the bottom and select About phone.
      3. Scroll to the bottom and tap Build number 7 times

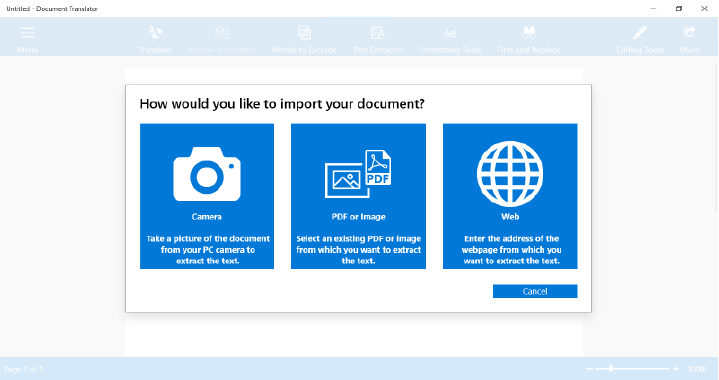
      [img=https://www.deskshare.com/forums/images/posts/MSRPpost3774-1.png]USB Debugging[/img]

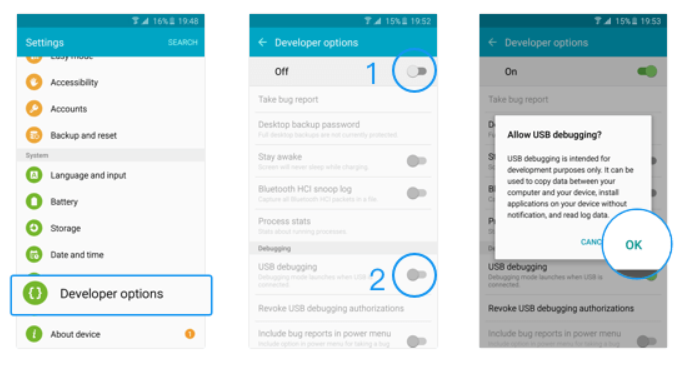
      1. Return to the previous screen to find Developer options, turn it ON
      2. Scroll down and enable USB debugging.

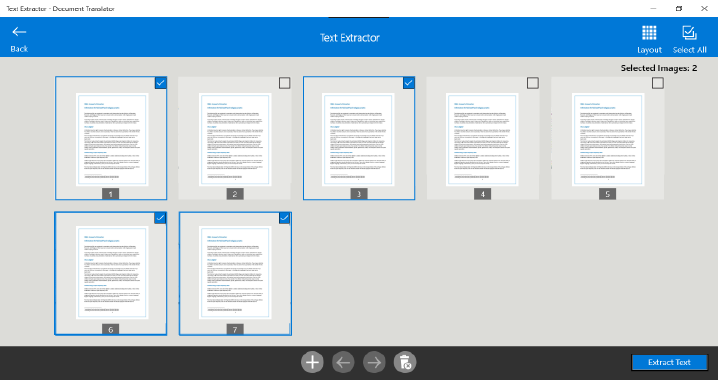
      [img=https://www.deskshare.com/forums/images/posts/MSRPpost3744-2.png]USB Debugging[/img]

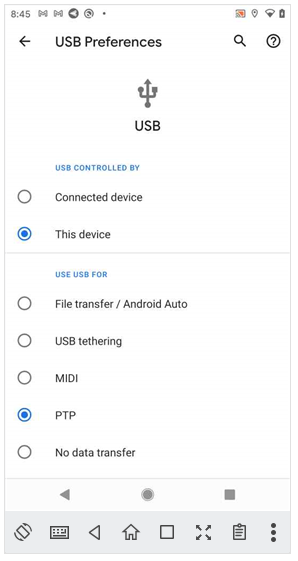
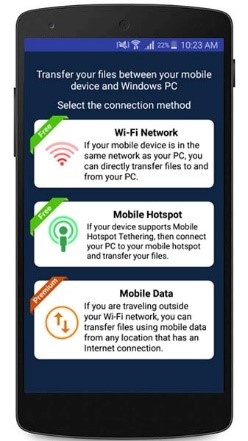
      If USB debugging is already enabled and device is not connecting and not listed then:

      1. Open the Settings app
      2. Search for 'USB Preferences' option
      3. Set 'USE USB FOR' to 'PTP' as shown in this screenshot:

      [img=https://www.deskshare.com/forums/images/posts/MSRPpost3744-3.png]USB Debugging[/img]

      posted in My Screen Recorder
      D
      DeskShare_-_Support
    • RE: How to initially install and setup Mobile to PC File Transfer

      Hello Jim,

      First,install Mobile to PC File Transfer from the Google Play store.

      Next, install FTP Manager Lite on your PC.

      Finally, view this instructional video:
      Transfer files from your Android to PC with PC to Mobile Transfer

      posted in Mobile to PC File Transfer
      D
      DeskShare_-_Support
    • RE: How do I translate text from images?

      Document Translator allows you to extract text from images and translate them.

      To get the text from images, click the ‘Text Extractor’ icon on the toolbar. You will see a screen with options to extract text from PDF, image or Web. If you have images of documents in your PC then select the option to extract text from the image.

      [img=https://www.deskshare.com/forums/images/posts/DTPost3745-1.png]Extract Text from Image and translate[/img]

      Select the scanned images and click the ‘Extract Text’ button. You will get the text from all images into an editable format.

      [img=https://www.deskshare.com/forums/images/posts/DTPost3745-2.png]Translate text in Image[/img]

      Next, click the **Translate **icon and select the language for translation to ‘English’. Then click the ‘Translate’ button. Once the translation process completes, you will see the documents in English language. This way you can translate all your German documents to English.

      posted in Document Translator
      D
      DeskShare_-_Support
    • RE: Transfer files between your mobile device and PC without an internet connection or USB cables

      Mobile to PC File Transfer allows you to transfer files using a ‘Mobile Hotspot’ when you don’t have a Wi-Fi network. Mobile Hotspot does not require an internet connection. It displays as a Wi-Fi connection on your PC.

      First, open the Mobile to PC File Transfer application and select ‘Mobile Hotspot’ connection method.

      [img=https://www.deskshare.com/forums/images/posts/PCTMpost3739.jpg]Mobile to PC File Transfer[/img]

      Even if you don’t have a Wi-Fi network, you can still turn on ‘Mobile Hotspot’ from your device settings. Next, note down the URL and password to connect.

      [img=https://www.deskshare.com/forums/images/posts/PCTMpost3739-1.jpg]Mobile to PC URL[/img]

      On your PC, turn on the Wi-Fi. You should see your device's mobile hotspot name in the Wi-Fi network list. Select the hotspot created by your device and click the Connect button.

      Next, open FTP Manager Lite on your Windows PC and create a connection profile. To learn how to create a connection profile, watch the video tutorial. Once the connection is created, you can easily transfer files between your PC and mobile device without an internet connection or USB cable.

      [img=https://www.deskshare.com/forums/images/posts/PCTMpost3739-2.jpg]FTP Manager Lite Mobile Connection[/img]

      posted in Mobile to PC File Transfer
      D
      DeskShare_-_Support
    • RE: Accessing cameras from Security Monitor Pro directly from my Android mobile device

      You can access cameras added in Security Monitor Pro remotely from anywhere using Remote Access. To view the cameras directly on your mobile device, you have to use Security Monitor Pro with an Android app - IP Camera Monitor.

      First, you can start by installing an Android mobile app – IP Camera Monitor on your device from the Google Play Store.

      To configure settings for remote access, open Security Monitor Pro and click the ‘Remote Access’ icon from the toolbar. Then select an option to ‘Enable Android mobile app access’. Note the ID and password shown on the remote access dialog and click OK to save the settings.

      Next, open IP Camera Monitor, click Add Camera and select ‘Connect to Security Monitor Pro’. Enter the ID and password from remote access dialog in the login screen and click Connect. You will now see all the connected cameras from Security Monitor Pro on your Android mobile device.

      You can remotely control actions such as monitoring, video recording, and capturing a photo. Access recorded media files and event logs directly from your device.

      posted in Security Monitor Pro
      D
      DeskShare_-_Support
    • RE: Transferring files from my PC into a compressed zip folder

      Auto FTP Manager allows you to transfer local files directly into a compressed zip folder. You can easily drag and drop files from your PC to the zip folder.

      Auto FTP Manager lists compressed zip folders in the file manager. You can drag files from your source folder and drop it directly onto a zip folder. Once the file is transferred, double click on the zip folder. You will see that the file is successfully transferred.

      Note: To transfer files to the zip folder, the destination folder should be present locally on your PC.

      posted in Auto FTP Manager
      D
      DeskShare_-_Support
    • RE: Keep broadcasting running without interruptions

      Screen Cast application is designed to work well without interruptions. If you face an issue, there are 2 main reasons why broadcasting may stop.

      1. Memory management issues
      2. Network speed

      If your device freezes, stops responding or is stuck on the screen, one of the steps below could fix the issue.

      1. Do not keep other applications running which are not required while you use Screen Cast. Devices have a limited amount of memory and it is distributed among the apps. If other applications are running and using more memory space, Screen Cast will not get enough memory space to work efficiently.

      2. Use a high-speed network for the continuous broadcast of your mobile screen. Sometimes your app might be responding slowly because of your slow internet speed. Connection speed is important when your app uses network related services.

      3. You can start broadcasting again, check the login details and refresh the browser.

      posted in Screen Cast
      D
      DeskShare_-_Support
    • RE: Transferring files between two mobile devices

      Auto FTP Manager makes it easy to transfer files between two mobile devices directly from your computer.

      On both mobile devices, install the PC to Mobile Transfer application. Open the app and note down the ID and password shown on each of the devices.

      [img=https://www.deskshare.com/forums/images/posts/AFMpost6227.jpg]PC to Mobile Transfer ID[/img]

      Next, create a connection profile in Auto FTP Manager. Go to File >> New Connection profile and select the option ‘Android Mobile Device’ from both the dropdowns. You can select Quick Connect or Automated Profile. Next, enter the ID and password for both the devices and create the connection profile.

      [img=https://www.deskshare.com/forums/images/posts/AFMpost6227-1.jpg]PC to Mobile Transfer Connection[/img]

      Once the profiles are created, you can transfer files between the Android mobile devices directly from your computer.

      posted in Auto FTP Manager
      D
      DeskShare_-_Support
    • RE: Which connection type to select in Screen Cast?

      Using Screen Cast you can view your mobile screen on any device with a browser.

      If you have Wi-Fi turned on and you are in the same network as your PC then select the connection type as ‘Wi-Fi network’.

      If you don't have a Wi-Fi connection, select mobile hotspot and you can connect your PC to the mobile hotspot Screen Cast creates.

      If your mobile device and PC are far apart then you can use ‘Mobile Data’. This selection will use your mobile network. You can use the browser on your PC to connect to the URL displayed on your mobile screen.

      To select the connection type, go to Settings in Screen Cast and choose the Connection Type as 'Wi-Fi Network', 'Mobile Hotspot' or ‘Mobile Data’.

      [img=https://www.deskshare.com/forums/images/posts/SCpost6224.jpg]Connection Settings in Screen Cast[/img]

      You can easily switch between connection types depending on the network of your mobile device and PC.

      posted in Screen Cast
      D
      DeskShare_-_Support
    • RE: Password protect my mobile camera to prevent strangers from viewing it

      IP Phone Camera allows you to set a password to prevent anyone from viewing your phone’s camera. Password protection is a premium feature.

      To set a password, first purchase the premium version from Settings >> Upgrade. Once you have activated the premium version, open IP Phone Camera and go to Settings. Select the ‘Require password for viewing camera’ option and press back on the mobile screen.

      Press ‘Start Broadcasting’ and the URL, Username and password will be displayed on your main screen.

      Next, open your browser, enter the URL from the app. Enter the username and password to view your mobile camera. No one can view your camera without the username and password.

      Note: If you use the ‘Mobile Data’ connection type, you will always require the username and password to view your mobile camera.

      posted in IP Phone Camera
      D
      DeskShare_-_Support
    • RE: How do I use mobile hotspot with Screen Cast?

      Screen Cast allows you to broadcast your mobile screen using a ‘Mobile Hotspot’ when you don’t have an Internet connection.

      First, open the Screen Cast application, select 'Connection Type' as Mobile Hotspot and click ‘Start Broadcasting’.

      Then configure hotspot from your mobile device settings. Note down the URL and password to connect.

      Next on your PC, turn on the Wi-Fi and select mobile hotspot. You should see your device's mobile hotspot network name in the Wi-Fi network list. Click on the hotspot created by your device and click the Connect button.

      Now, open a browser on your PC and enter the URL from your mobile device. You will see your mobile screen on the PC.

      posted in Screen Cast
      D
      DeskShare_-_Support
    • RE: I want to view my phone camera remotely

      Using IP Phone Camera, you can easily view what’s happening beyond your local network.

      To see what’s happening at customer’s place, you have to tell your customer to install the IP Phone Camera app on his mobile device and start broadcasting. The mobile device will act as a camera and you will be able to view it directly from your office. The device should be set in a proper position so that you can see how best to help the customer.

      To start broadcasting from the mobile device when there is no Wi-Fi available, open the application, select ‘Mobile Data’ and click ‘Start Broadcasting’.

      If you want to view the mobile camera remotely, you should know the login details from the application. Tell your customer to share the login details with you.

      Once you have the login details, enter the URL in your browser. You can use any device with a browser such as a PC or Android device. Then enter the ID, password and click Login.

      Once the connection is established, you can see what is happening at customer’s place and help him do the configuration.

      posted in IP Phone Camera
      D
      DeskShare_-_Support
    • RE: Broadcast your mobile screen from anywhere using mobile data

      You can use ‘Mobile Data’ option in Screen Cast to broadcast your mobile screen to any device with a browser, even when you are not present on the same network. This helps you to provide the display of your mobile screen from anywhere.

      First, open Screen Cast and select the connection type as ‘Mobile Data’. This is a premium feature and will require a monthly subscription. You can cancel the monthly subscription at any time.

      Next, on the home screen, click ‘Start Broadcasting’ and share the login details shown on your device with your friend. Your friend will receive a message that includes a webpage link and login details.

      This way your friend will be able to login on any browser and see your mobile screen.

      posted in Screen Cast
      D
      DeskShare_-_Support
    • RE: Generating transfer reports only when a file transfer failed

      Auto FTP Manager allows you to save transfer report when a failure occurs. You can choose to generate the transfer report on specific events.

      To configure settings of the transfer report for your automated transfer profile, go to Profiles >> Edit Profile. On the ‘Specify Automated Transfer Settings’ page, select the Save or send transfer report option under the ‘On completion of transfer’ section and click the **Configure **button.

      Then on ‘Transfer report settings’ dialog, select ‘When an automated transfer is completed’ option and choose ‘Save reports when there are file transfer failures’ option. Then you can choose the location to save transfer report, click Ok and finish the settings.

      Now, whenever an automated transfer is completed, the transfer report will be generated only if there are file transfer failures.

      posted in Auto FTP Manager
      D
      DeskShare_-_Support
    • RE: Transferring files from my PC to any remote PC on my network

      Auto FTP Manager makes it easy to transfer files between PCs present on the same network.

      To transfer files between two PCs, first create a connection profile. Go to File >> New Connection Profile and select options from the dropdown to transfer files between PC folder and Remote PC folder. You can choose the connection profile type as Quick Connect or Automated Profile.

      Next, you will see the list of remote PCs present on the network. Select the remote PC from the list or if it is not present in the list then enter the IP address and password of the remote PC where you want to transfer files. You need to know the password shown on Settings screen of remote PC. Next, create the connection profile and finish the settings.

      Here, please make sure that the Auto FTP Manager is running and Remote Transfer is enabled on the remote PC. Once the settings are configured, click ‘Test Connection’ to verify the connection settings. Next, create the connection profile and finish the settings.

      Once the profile is created, you will see the file manager where you can transfer the files between your PC and remote PC connected to the same network.

      posted in Auto FTP Manager
      D
      DeskShare_-_Support
    • RE: Changing the dictation language in Dictation Pro on Windows 10

      You can easily dictate in the Spanish language with Dictation Pro. This speech recognition software allows you to dictate in multiple languages.

      To dictate in Spanish, the language should be installed on your computer. To install the Spanish language on your PC, select the Start button, then select Settings > Time & Language > Region & Language.

      Next, select Add a language and you will be shown all the languages that Windows 10 currently supports. Choose the language as ‘Spanish (Spain)’.

      [img=https://www.deskshare.com/forums/images/posts/DPpost6200.png]Change your language in Windows[/img]

      Click 'Next’ and make sure that the Speech option checkbox is selected. Then click ‘Install’ to start downloading the Language Pack and Speech.

      [img=https://www.deskshare.com/forums/images/posts/DPpost6200-1.png]Download Windows 10 Language & Speech Pack[/img]

      Once the language is installed on your PC, open Dictation Pro and go to Menu >> Settings. Select the dictation language as ‘Spanish (Spain)’ and save the settings. Then click ‘Start Dictation’ to create your documents speaking Spanish.

      posted in Dictation Pro
      D
      DeskShare_-_Support
    • RE: Transfer files between PC and Android mobile device using Auto FTP Manager

      You can transfer files between your PC and android devices using Auto FTP Manager with Android application- PC To Mobile Transfer.

      First, install PC To Mobile Transfer on your Android device. Download this FREE application from the Google Play Store.

      To transfer files between your PC and mobile device, open the PC to Mobile Transfer app on your device, note down the ID and Password to use in Auto FTP Manager.

      Then open Auto FTP Manager, go to File >> New Connection Profile. Create a connection profile to transfer files between your PC and your mobile device.

      Now go to the next page, enter the mobile connection details and create the connection profile.

      This way you can easily move your files between your PC and Android mobile device.

      posted in Auto FTP Manager
      D
      DeskShare_-_Support
    • RE: Automatically rename files after successful transfer

      You can easily add the action rule to automatically rename files after successful transfer using Auto FTP Manager. Use the file rename rules to change the file name after upload.

      To add a rename rule for your automated transfer profile, go to Profiles >> Edit Profile. On the Edit Connection Profile dialog, check Rename files after transfer on <Folder 2> and click the Configure button.

      On the ‘Configure Rename Rules’ dialog, click New to add a rename rule. Then select the rule to Add Date and Time to End and choose the Date and Time option from the ‘Format’ drop-down. Once the rename rule is added, finish the settings.

      Now whenever an automated file transfer is successfully completed, the date and time will be appended to the file names on the target location.

      If multiple rename rules are added, each configured rule will be applied to the filename sequentially.

      posted in Auto FTP Manager
      D
      DeskShare_-_Support
    • RE: Transferring files on weekdays every hour

      You can add a schedule to transfer files on weekdays and repeat the action every hour in Auto FTP Manager.

      To add a schedule, click Profiles >> Edit Profile and go to Automated Transfer Settings page. Click on the ‘Configure’ button under the ‘Schedule Transfers’ section.

      Choose Weekly Schedule option and then select the days on which you want to perform file transfer. Then set Repeat after every option to ‘1 hour’ and select time duration for which the schedule should repeat. Click Ok to save the schedule and next to complete the profile settings.

      The files will be transferred on the specified weekdays and the schedule will run every 1 hour.

      posted in Auto FTP Manager
      D
      DeskShare_-_Support
    • RE: Using Security Monitor Pro after upgrade to Windows 10

      The April update of Windows 10 prevents older versions of Security Monitor Pro from running correctly.

      Please download and install the latest version of the software. The newly downloaded version will work on your Windows 10 PC.

      posted in Security Monitor Pro
      D
      DeskShare_-_Support
    • 1 / 1